Thursday, 8 October 2020

The Outer Layer - Head

Oops, procrastination and squirrel brain posts have unintentionally pushed this one back from when I originally scheduled it to post... By 2 weeks at least now. Sorry! I had intended to do the Regency Wardrobe group as a straight series of posts, but brain go "Wheee! Look over there!" and I did. Mea culpa...

So back to the original plan: The outer layers of my planned Regency costume.

 The outer layer in this project is the layer where I will attempt to make something, but where I accept that I may well run out of time. For the purposes of these posts I am going to list the things I would like to make (and may make later if I don't have time this time), and alternatives I may consider adding instead. I am considering here three specific areas:

  1. Head
  2. Body
  3. Feet

Head

Head coverings of some kind were both normal and socially acceptable for adults of both genders. For women what was expected would vary depending on their age, but even in a ball situation, the hair would have some sort of decorative covering, even if it did more to adorn than conceal. Depending on your age, wealth, and taste, these could range from simple and plain, to incredibly elaborate affairs. Common types of coverings included Caps, Bonnets, and Turbans.While millinery was a definite profession by this time, it wasn't uncommon for women to buy hats to trim at home, or to trim and retrim the same hat to go with multiple outfits, so fashion plates were useful places for the contemporary woman to gather inspiration. It has been argued that these plates show the extremes of fashion, akin to modern catwalks, or show composites of various options which could be mixed, matched, and omitted according to the wearer's tastes. Being able to modify or create your own headwear allowed women, in particular, a lot of capacity for personalisation.

So what would a women in around 1818 have worn throughout the day?

In the morning, women wore lighter headwear, such as lace caps, linen bonnets, and similar items. These were "at home" items, and seem to have been commonly made of the same sort of fabrics and colours as both visible and intimate underwear. The fashion plate below shows a woman sitting in a very decorated yet simple white dress. The tucks and lace on the hem are reminiscent of petticoat edgings. The dress has looser sleeves than the dresses worn outside or later in the day, and the fichu at the neckline would have kept her warm in a colder house. Her cap is completely in line with this "undress" fashion style, with a deceptively simple fabric cap to keep her hair out the way. I say deceptively, because like her dress, the simple shape is then covered with a huge ribbon (the width and depth of her forehead), and a very frilly decorative border. The whole ensemble is about the impression of intimacy, for an at home, without actually being either simple or undressed.

Morning Dress, 1818, La Belle Assemblée


Candice Hern's Regency World shows a number of fashion plates of hats dating from this about 1800-1817. Although there were variations each season and by activity, from about 1815 one popular shape for daywear was of a blocky crown (think of the crown part of a top hat) tilted back about 45° from the face, with a curved brim. The brims on this style gradually grow deeper and more exaggerated as the years progress. By 1818 a fashion plate from La Belle Assemblée shows a deep sweeping curved brim coming out from the nape of the neck outwards to shade the whole face, and then upwards above the face. The upper tip of the brim is about the same distance up from the head as the crown, or even a little further, and forms an angle of about 90° with the crown. Depending on the style, some brims form a straight line out from the crown, and others have a slight curve. All the plates I've seen of this style of bonnet, show that the edge of the brim, and the top of the crown were Very heavily decorated, with options such as lace, ribbon ruffles, and what looks like cording being quite popular. They were then finished with a broad ribbon running from the centre of the crown down to a point below the chin. This was to secure the bonnet to the head. It's not clear from the plates whether this ribbon was sewn into the seams of the bonnet form itself, sewn into the covering, or attached underneath a band around the base of the crown. Some prints (e.g. the middle left one in the image below) have a triangular effect with the chin ribbon being mirrored upwards and then along the back edge. The others on the page show a slightly puckered ribbon extending out below the crown ribbon.

Parisian Bonnets, 1818, La Belle Assemblée

Evening Dress fashion plats often seem to show a type of hat that is reminiscent of military hats, covered with a riot of feathers. Unlike the bonnets described above, these are worn much more vertically up from the head, extending the profile upwards, with the feathers above even the tops of the hats. Other evening dress plates show more turban like affairs wrapping around the hair, and again topped with feathers.

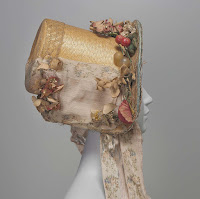
An undressed bonnet was not a thing that a lady of the time would have accepted! In addition to the edge trims, bonnets were also decorated with floral decorations, and possibly other natural items. This poke bonnet from the 1820s at the Met Museum, while of a different bonnet shape from the 18-teens, shows a wonderful riot of leaves, flowers and other plant matter. Decorations were seasonal and also influenced by activity. Feathers seem to have been prefered for evenings, and also for winter outdoors activities like riding. Flowers were popular for daytime wear in the spring and summer. Autumn seems to have brought in berries, leaves and other foliage. Ribbons

Hats and bonnet forms were often covered in silks, which could be of a coordinating or in a contrasting colour. Other fabrics could be used depending on your means and your outfit, but silk appears to have been both the most common (or the most common to survive) and the ideal described in the women's journals. 

Making

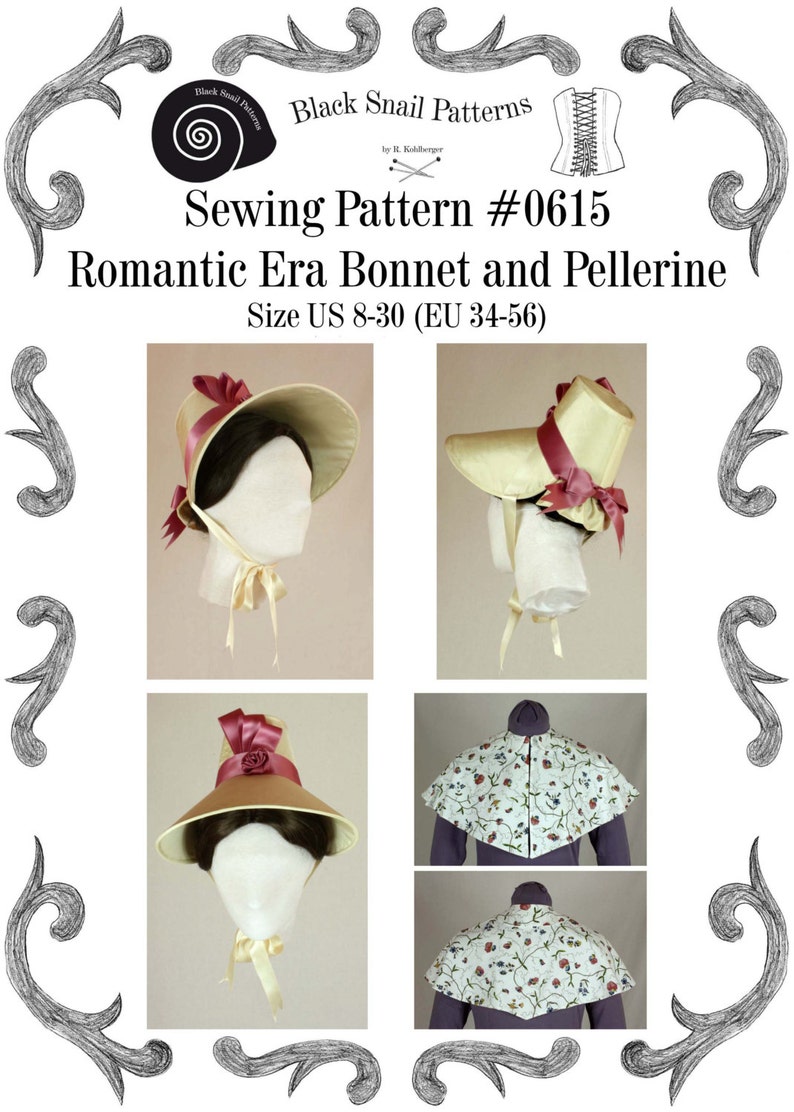
So what have I gone for? I decided quite quickly that a bonnet in the style of the Parisian Bonnets plate above would be the most appropriate option for me, based on the time of day (afternoon), the activity (a promenade), and my personal preferences. While looking at Black Snail Patterns during their sale, their "Romantic Era" bonnet pattern fell into my basket. *cough* Although this pattern is designed for about a decade later, the broad shape of the bonnet in the pattern is not dissimilar to the one above, and I felt that it wouldn't be too difficult to adapt to the 1818 shape. If it doesn't work, I may just go ahead and draft my own pattern instead!

Black Snail Sewing Pattern #0615 - Romantic Era Bonnet & Pellerine

I am currently piecing together the PDF pattern for this bonnet, as I plan to decorate it for part of my Harvest Hat challenge entry.

I will post the Body & Feet work in a separate post, probably tomorrow, as this one has got rather long. Again.

Thursday, 1 October 2020

October craft plan

 I've decided I'm going to post a simple projects plan at the beginning of each month. Three contingencies though for my mental health:

  1. No guilt - If time slips, it slips, I will not feel guilt for life, health, or finances altering my plans
  2. Plans may change - I can make any changes needed to allow for life, health, and "other stuff"
  3. Nothing is final - To allow for the above, I acknowledge that plans are just that, plans, not final decisions.

October craft plan

October
  1. Harvest hat
    a) Regency
    b) 1890s/Edwardian
  2. Fan-skirt (wool blend)
  3. Mock-up stays
    Because needed for November dress mock-up
  4. Mock-up Edwardian blouse
    If time
November
  1. Continue work on Regency stays
  2. Mock-up Regency dress
  3. Final Edwardian blouse
December 
  1. Final stays
    a) Lots of adjusting probably needed, and
    b) December is likely to be busy!
  2. Christmas presents!
January
  1. Final Regency dress
Unspecified
  1. Petticoat
  2. Chemise
  3. American Duchess cape, but with a hood
  4. 1890s men's three piece suit
  5. 1830s men's three piece suit
  6. 100% wool skirt

Saturday, 26 September 2020

Harvest Millinery - inspiration post

This is going to be a fairly light post with links and images to inspiration sources I have for each of my final ideas. This is not a decision post, because I haven't decided yet!

1. Pseudo-medieval hood(ie)


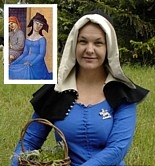
This image from Rosalie Gilbert has a shape I love. I prefer closed to open hoods, but the buttons would allow me to make a hood in the open style but which can be closed when I want or need more insulation from the elements. She also includes a useful way to draft an appropriate pattern for this style.


Couture Mayah's post from 2011 shows a rather beautiful hood where she trims the hood using a contrasting wool for the dagging at the edges. 


Racaire's Workshop has images of a lovely embroidered hood made in c2009. While the quality of the embroidery I feel is far beyond my current abilities, I am inspired by the use of contrasting the thread and fabric colours. Racaire suggests using chain stitch, which I know and could possibly work with providing the imagery was Very simple.

Notably both the previous two examples refer to the Medieval Tailor's Assistant book, which I already own.


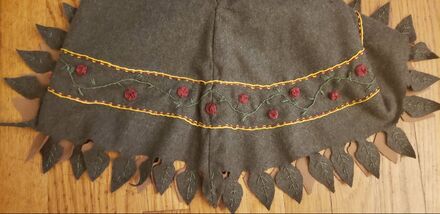
Finally, I was really inspired by the decorations on the second (green) hood shown by Maille is Riveting. The idea of a simple band of decoration, plus the leaf-shaped dagging really got me excited to have a go. 

I think that even if I don't do this for the Challenge, I want to do one anyway before the end of the year! In that situation, I will probably make the shape somewhat different from a normal late medieval hood, and take inspiration from ponchos (a longer back), consider making the front more of a scarf cross-over effect, and dropping the liripipe altogether.

2. Simple Regency bonnet

This is the bonnet pattern that happened to fall into my basket during the recent Black Snail sale:

Black Snail: Romantic Era Bonnet pattern

I could potentially trim the shape with autumnal themed items, like berries and leaves. I'm not sure, however, how autumnal colours will go with the petrol-blue of the dress I want to make.

This hat from the Museum of Fine Arts, Boston, is a nice inspiration for trimming an 1820s hat. Although with the MFA hat being of a different shape to my pattern, I can't be certain how accurate it would be to transfer that style of decoration across to another type of bonnet.


Another 1820s hat, but from the Met Museum, which has a brim somewhat closer to that of the pattern above. This one is even decorated in a style that could be described as almost Autumnal!

For a style closer to the pattern, these images from a fashion plate of 1818 (La Belle Assemblée) show floral, foliage and ribbon decorations. Source: Flickr.

3. Trimmed late Victorian hat

Flipping through the Met Museum's web archive, I can see that straw based hats with wider brims were in fashion (with variations of course) from the 1890s through to the 1910s. That covers the 1890s of the fan skirt alongside the "Edwardian" of the blouse. While this costume would not be historically accurate together, I feel that none of it would be too out of place aesthetically when worn together.

Possible sources of inspiration (All (c) The Metropolitan Museum of Art)


This hat is dated 1892-95 and is made of straw with silk and feathers. The floral top decorations could make a nice historically inspired hat, but this hat itself would be useless in a practical sense because it is angled so as to leave the entire back of the head and neck exposed. No good if I wanted to wear this to keep the sun off.

The Met also have a lovely simple boater from c1890, but I would be unsure whether that would be a woman's hat. That said, in a non-accurate costume, does that matter?

Moving forwards to the 1910s, I found some much more useful images for inspiration. By this decade the hats seem to be angled towards the back of the head again, making them more useful for my modern wear. They are exceedingly extravagantly decorated in some cases, but that might be good for the Challenge, and at the same time, I can deviate if I choose since I'm not intending on creating a true replica.

This 1910s straw hat has a band of what might be velvet underneath the brim, and a large cluster of flowers across the front brim. This style could be an awesome source for a Challenge hat - Straw base, autumnal coloured velvet band, and then a riot of autumnal leaves and flowers with a large ribbon around the crown.

Another straw hat dated c1911 shows how the brim width and crown depth could vary. That's quite useful when finding a relatively inexpensive base straw hat to begin with.

Instead of straw, this c1910 hat is described as being made of cotton, although in a similar shape and weave to the straw ones above. Like the first 1910s straw hat, this one has a band of fabric below the brim, and a wide band around the crown (of the same colour in this instance).

A last straw hat, dated again to c1910, is also made of straw. It's quite a bright yellow, compared to the first two so may possibly be dyed, or even painted? In common with the first and third of 1910s hats linked above this hat has a band below the brim, and another around the crown. As for the first straw hat, the hat is decorated with flowers and leaves although here they are attached onto the front of the crown itself. This hat is also different in that it isn't the simple circular or oval shape, but instead has a downward sweep almost presaging the 1920s cloche hat. It's a rather lovely hat to take as a modern sunhat due to the deep drop of the brim towards the back, which would nicely protect the nape of the neck.

Unfortunately, due to rights restrictions, none of images of the 20th Century hats can be reproduced, so you'll need to look at them on the Met's website.

Wednesday, 23 September 2020

Harvest Millinery

 I am part of the British Guild of Historical Costumers channel on Discord, which evolved out of the CoCoVid event this summer. They've proven to be fantastic bad influences and I love them all dearly! Our lovely Admin decided to run a Historical Harvest Hat Challenge.


So, the key parameters are:

  • Harvest, autumnal, or halloween themed
  • Hat or other object worn on the head (bonnets, hoods, tiaras, and so on are OK, for example)
  • Historically inspired or historically accurate

I have currently got a few ideas, so this is a rambling post where I try to put my thoughts together into something coherent enough to actually make... For the sake of my hands and reader's brains, wherever I type "hat" below, please view it as a general term equating to "headwear within the competition parameters". So with that said, here are my thoughts, inspiration, and personal parameters.

Endurability 

Yes, "endurability" is actually a real word.

My first thought was that I need whatever I make to have a life outside of this competition. The object made needs to endure beyond this one event. This is both a financial and an ethical consideration. Financial because it seems incredibly, pointlessly, wasteful to make a hat that I won't use otherwise. I don't currently wear any kind of headwear a lot because I am absent minded and lose things all too easily. 

Ethically, I am also uncomfortable with spending time, money and effort on something that is then going to be either pitched in a bin (think schoolkids' Harvest Festival Crowns) or otherwise sat on a shelf gathering dust. This is different from a financial consideration because it's not about whether I have the money, but on the morality of making such a disposable product. I am gently moving myself towards a more renewable and sustainable lifestyle, and one way in which I am consciously doing that is by trying to choose against Fast Fashion. To me, making a totally disposable challenge entry would be utterly contradictory to that!

Practicality

My only thing I wear on my head with any regularity is a sunhat when walking midsummer, because I prefer to neither burn nor get sunstroke! But, a sunhat wouldn't really fit within the parameters of the challenge, so I scrapped that idea from the get-go.

So what else would be practically useful? A medieval hood would be lovely, but I haven't been actively involved with a re-enactment group in over a decade. That means that a re-enactment ready piece of clothing would also be rather wasteful at present - if I start attending again, I can continue to wear my existing green hood, since I'm unlikely to have grown out of it!

What about non-hatlike headwear? I used to wear headbands a lot, but I don't think I've worn one since the 1990s. I stopped wearing them mostly because while I liked the simplicity of brush, band, go, most purchased bands pinch in painfully on my head, and bunch out higher up. I also wear glasses now, and I suspect that the pinching point on a headband would be pretty close to the pinchy point on my glasses when I've been stuck in telecons for hours (right where the ends of the arms will push in if you're stuck wearing over-ear cups for too long). So no, not doing a headband even if they can be pretty and would be fairly inexpensive to make - I'm fairly sure that I'd never actually wear it again!

Ideas

I've currently got a few ideas:

Mediaeval Hoodie

Thinking on medieval hoods set me on a separate thought chain: I spend a fair bit of time up in soggy Manchester. Which rains, a lot. I have two coats - one warm one without a hood, and one light one with a hood. The light one is good for summer squalls, but is quite old and so I'd be concerned about wearing it in sustained or heavier rain. The warm one is a gorgeous Hellbunny Millie one in teal. It keeps my body dry, but my head gets more than a little damp. I currently wear a hoodie under it when I know I'm likely to need a head covering, but that bulks it out and can make it a little uncomfortable, especially if I want to also wear a warm jumper or cardigan in the office or wherever. In other situations I have a scarf that I can fold to wear over my head, but of course that's not terribly waterproof, but is portable and unlike an umbrella, is unlikely to be accidentally put down and forgotten.

What about a mediaeval-style hood or hoodie that I can wear under my Millie coat to give a hood in the winter when I need it but without spoiling its line or making it uncomfortably bulky? It would need to be waterproof, or at least water resistant, but making it in wool would help with that. If it isn't needed to be historically accurate, I can choose a colour of wool that I just like regardless of modern dyes or social status considerations. I could also embroider it, and even alter the pattern to be more "inspired by" than a copy-of type thing. This would be a practical make that I would use, and also not too financially onerous because while 100% wool is expensive, I wouldn't need a hell of a lot for one hood. Even using pure linen, cotton, or even silk for a lining wouldn't be impossible because of the small scale of the item. I've also seen some pseudo-historical ones (SCA accurate, so plausible but possibly no direct evidence) with embroidery and even shaped dagging. That could bring the autumnal theme in beautifully! 

Historical costume - JA Festival

I could also make a Regency bonnet, which I will need to make/buy at some point for my Regency outfit (see my forthcoming post on outerwear). If I brought forward my headwear plans for the Jane Austen Festival, and also made the decorations autumnal themed, then perhaps that would work? I would need to consider colours more carefully as I don't have the dress fabric yet, and my original rough plan for a Regency bonnet involved covering it with the same fabric as used for the dress. Without the final fabric, I would have to be very careful not to have it accidentally clashing. This is even more of a risk because I want to use that very specific greenish-blue that is shown in the Ginsburg and DAR photos. Finding colours that fit with the theme AND which wouldn't clash with the hypothetical dress fabric will be quite difficult.

Historical costume - other eras

What about other eras? 

I could make a general Victorian era bonnet or cap and then build a costume around it later. That would stop the item being wasted but wouldn't stop it gathering dust for a year or more while I find time and a costume to go with it. I think that this would be a fun project, but probably not for this year...

I could maybe look at a late Victorian or Edwardian hat to go with my 1890s/Edwardian style ahistorical ensemble I should be starting soon. That would be appropriate to a specific costume, and I am already planning to make the skirt in either russet or brown, which would harmonise well. On the other hand, I wasn't planning this outfit as being strictly historical, and therefore wasn't really planning on having an appropriate hat to go with it at all.

Current Plans

Currently my plans are bobbling between three ideas.

  1. An embroidered and (ivy) leaf-dagged pseudo-medieval hood to wear either with my Millie coat, or a new one since my lovely Millie is a fair few years old and beginning to show it
  2. A simple Regency bonnet with autumnal decorations. Simple would reduce the chances of clashing with my final fabric choices, and I could even add trimmings later (e.g. bias ribbon bows) that tie it more closely to the dress colour.
  3. A late Victorian hat that just looks cool
The embroidered hood is a gorgeous idea, and I can see the practical uses for it. Downside is mostly a skill based issue - am I able to do the embroidery I envision. Without the embroidery I don't know if I like this idea as much.

The Regency bonnet is something that I have instructions for, and was planning to make, just not this year. Might be pricey, but it just re-jiggs my existing project plan not replaces it.

A late Victorian hat trimming project would potentially be cheap and simple, and I could maybe repurpose the result into a summer hat.

I shall continue thinking on this and then share my project plan once I have my ideas in place. Of course it's entirely plausible that I'm going to try making more than one of these because Why Not?? 

Friday, 18 September 2020

Getting sidetracked. And managing being sidetracked.

 While I don't have ADHD (to my knowledge!) my ASD symptoms overlap to some extent. One big area of dysfunction for me is what is known in my house as the "Oooh shinies" - or "squirrelling" or "butterflies"... Basically it's when I'm happily involved in one project or concept, and stumble across something else, and now need to research the hell out of it. 

I've recently noticed how it affect craft projects too. At first, it wasn't a major problem - researching cloth, colours (hello recent post on Clarence Blue!), or fabric weaves wasn't too far from my existing point of research. I've been stressing at work this week, which has triggered hypersomnia for me (not unusual), so I've been mostly a semi-zombie from mid afternoon for the last week or so. I spent yesterday evening vaguely moving crafty ideas around on Trello to create a list of a) what I own, and b) a plan for making it (whether that be 2 years hence or whatever). The trigger for that was that the other week Black Snail had a sale on some of their PDF patterns, so I bought a bunch, including two full sets of patterns to make for my husband (when I've never made men's clothes before, so guess I'm learning that!). 

I bought three intentional patterns, plus some others because they were on offer (foolish, but at least PDFs don't take up space or get damaged!):

  1. Spencer/Redingote

  2. Regency/1830s bonnet.

  3. Corset, petticoat and chemise pattern (1830s, but the corset still has the line for the 1818 dress, and this is a corded one which I was particularly interested in trying).

  4. Jacket, trousers, and waistcoat patterns for c1890s

  5. Jacket, trousers, and waistcoat patterns for c1830s

  6. Fan-skirt (1890s)

  7. Edwardian blouse

I also received my Laughing Moon dress pattern for the Regency dress. So, way forward is obvious, no? Here was my plan:

  1. Mock up corset and adjust for sizing - use medieval shift for underneath for fitting
    Adjust, rinse, repeat.
  2. Mock up dress with basic corseting for sizing
    Adjust etc.
  3. Make a petticoat using dress pattern to follow the same shape.
    Consider cording bottom inch of hem per Black Snail pattern
  4. Make corset properly in decent fabric
  5. Make dress properly in decent fabric
  6. Evaluate time to event
    If time:
  7. Make bonnet
  8. Mock up spencer
  9. Make spencer
    If insufficient time:
  10. Buy a large appropriate shawl
  11. Buy a bonnet or other head covering
I started looking at each pattern to figure out the yardage, and found myself adding in the Fan-skirt, and then the Edwardian blouse patterns to my mental pile as well.

It now looks like I have found the fabric for making the fan-skirt before I've even started looking for the corset fabric. Argh! 

Having sat down and evaluated, though, I'm more comfortable now with starting with the skirt. It's been a while since I last did a proper sewing project - possibly even a decade now. The fan-skirt pattern is relatively straight forward, only really fits at one point on my body (waist), and is mostly formed of long straight seams. I think that starting with that pattern might actually be wise, because it will get me back into the swing of things - especially if I machine sew the long seams as it's even longer since I last used a machine to sew! Completing something will also give me a boost to work on the longer drag of the complicated corset mock ups, which will be hard and also almost completely new skills for me.

I also want to make the blouse, but that's possibly less urgent (I'll need to have a look at what I own that I can wear with the skirt once it's made). 

My NEW plan is:
  1. September into October
    Fan-skirt from a wool blend
    If I like it, and it's not too complex, I'd like to make another in pure wool.
  2. October
    Mock up corset
  3. October into November (as time off from Regency projects)
    Mock up blouse and then make properly
  4. November
    Mock up dress
  5. December 
    Finalise corset
  6. January
    Final dress
  7. February
    Petticoat
  8. March
    Chemise
Assuming that I can make one item a month, then I will have time to make make a bonnet - it does looks fun! And even possibly have time to make a spencer or redingote. 

Why that order?
Well the chemise is a) easiest to buy, and b) I can use an old medieval one for the purpose of fittings, so that goes at the bottom of the list. The petticoat can potentially be skipped, although the silhouette will be better with it, so that is next least important. The big change is my decision to weave the non-Regency items in amongst the Regency ones to give myself a break from the project. This is what brings me back to the ADHD comment. The ADHD community is really open about project and self-management, and in acknowledging the perennial problems of accidental distraction. I will write (one day?) about the (complementary) differences in self-help between the two communities. Anyway, one of the suggestions for managing distraction is to acknowledge it, and to actively manage it but NOT suppress it. What does that mean here? Well, basically, I acknowledge that I'm feeling the lure of another project, and I can permit myself add it to my list of things I'm making, but not both the later pieces. Secondly, I acknowledge that I'm likely to start getting distracted during the more complicated parts of my Regency project which means I need to consider two things: Breaking the project into completable chunks, and Building in distraction. Building in distraction for me, means factoring in some different or simpler tasks to weave in around those complicated overwhelming ones. Those tasks can give me the completion buzz to help continue with the main tasks. It's something I've been doing in my career for a while, and I need to bring it into my personal life too. 

And now I need to make do the Tesco order I've been forgetting to do all week. And set a reminder to collect my pills from the pharmacy tomorrow. Reminders - I need them!!

Oh, and finally, yes, this post is indeed a sidetrack in itself - I was actually writing a completely different post. Hey ho...

Self-help and the Neurodiverse communities - My experience

 This is a post I started writing in September 2020. Lets see how long it takes me to actually finish it! Hopefully less time than the one on Executive Dysfunction...

[Edit: It's October 2022 and I'm just going to publish this as it, chaos and all. It's hard to post later things that refer back to something that was Never Actually Published! I'm adding ends to some sentences, but I will write and schedule another post building on this later today rather than continually failing to release this one... I've back-dated the posting date.]

So, the ADHD and ASD communities have a lot of overlap, both in regards to the members of the community, and in the symptoms which each disorder has as symptomatic. They are still considered (as of DSM-V) to be separate conditions, but diagnosing one can sometimes mean actively seeking to rule out the other. All that said, the two communities support their tribes in different ways, but they're complementary not contradictory. As I age, I am finding that I benefit from dipping into each community for advice or support with different deficits, and that each community can be better at assisting with different kinds of issues.

So where do I go for what assistance types?

ADHD Community

The ADHD community is used to being vilified as "can't complete", always seeking the new thrill, and as being utterly disorganised. At extremes they're seen as incompetent and unable to successfully finish anything. Harmful stereotypes, which the community is there to support their fellows in finding ways through the disconnects. 

I turn to the ADHD community when I need help managing my executive dysfunction, my squirrelly brain, or just for managing feelings of uselessness.

Cartoonists like Dani Donovan (ADHDDD) and Pina (ADHD Alien) help me in two ways:

1. Identifying a trait that I have that I didn't know I was struggling with

2. Providing a space for discussion (e.g. on Twitter) about management of that specific trait in the cartoon

These two artists, in particular, have really helped me understand myself and my own struggles with life. Understanding is one major (and vital) step towards managing something. I can't manage what I don't know or understand.

I also have found a lot of being seen and support through the How to ADHD channel on YouTube.

ASD Community

The ASD community often focuses more on interpersonal communication. How to do it, how to fake it, whether it's worth faking it. Dealing with "masks" is another common topic of conversation within autism-related communities. Unlike the ADHD guys, we were seen as the bright ones who were a bit weird, as opposed to being the lazy one who "would do so well if we just applied ourselves"... This leads to different areas of low confidence. Interestingly, I feel far more confident in giving out advice on the ASD side, than within the ADHD groups - is this just because I have an ASD diagnosis? No idea!


Wednesday, 16 September 2020

The Visible Layers: The Dress, Part 2 - Practical plans

Images of the two Regency dresses I would like to approximately recreate. L: Ginsberg 1818, M & R: DAR Museum, c1818-1820.
Cora Ginsburg & DAR Dresses

Analysis of the Dresses 

Bodice:

Both the Cora Ginsburg and the DAR Museum dresses appear to be back fastening (there is no obvious opening on either fronts). The DAR Museum dress has a centre front seam, which may be an opening, but that would seem unusual for the time period, leading me to believe it's either intentional construction (e.g. for maternity/postpartum) or an adjustment. The round neckline appears to be hemmed all the way up indicating a probable back fastening, as the bodice construction suggests that a front opening would not open wide enough to be put on with a fixed band at the high waist. The neckline is gently scooped and not completely square.

The decorations on the Ginsburg bodice would seem to preclude a front fastening, and the shoulders don't appear to have a bib front either. Unfortunately I've not got access to an unobscured back view of either dress to be sure exactly how either was fastened. I adore the "woven" appearance of the front decoration on the Ginsburg bodice, but I suspect that the DAR Museum dress bodice will be more sensible to make as a first attempt Regency dress. The woven effect, to me, seems to simulate the crossed over bodices that were also around at this time. This bodice's neckline is squared off, with straight lines across the breasts and over the shoulders, and with clearly defined corners to the line. 

Sleeves:

Both dresses have long sleeves, but with differences in the decoration at the shoulders and cuffs. The DAR dress has capped shoulders with the banded decoration to reflect the hems and cuffs, and then a long and fairly loose sleeve ending in a slight gathering before the cuff decorations. The Ginsburg dress has the more common puffed shoulder ending in a bad around the upper bicep, and then extends out into the long sleeve. The sleeves on this dress are not as straight at the DAR ones, but do appear to have more fabric in them. They are gathered into the top band, then remain reasonably loose until mod forearm at which point they are gathered in tight with a decorative band that is a couple of inches wide. The cuffs then puff back out and continue to approximately the middle joint of the thumb.

Due to the more conservative style preferred in the newly independent United States, the necklines are relatively high compared to European fashions for the same style of dress. Both dresses have a more defined bodice space than would have been seen a few years earlier, presaging the silhouette of the 1830s.

Skirts and hemline

Both dresses are placed on mannequins to show a hemline that is just short of trailing on the floor, and neither has any evidence of a train. Both dresses are straight down from the high waists, projecting gently outwards to a width a few inches wider than the natural shoulders. 

The decoration on the DAR dress continues about a foot up the dress from the hem, whereas that on the Ginsburg dress only covers about half that height. The Ginsburg decoration is more fancy, but the contrasting colouration 

Possible patterns

There are a number of excellent patterns out there for Regency dresses, as well as guides and diagrams for DIY or draped variants. I'm certainly not experienced enough to drape, and I prefer the comfort of having a pattern, even if I often only follow them broadly. A non exhaustive list of pattern companies (in no particular order) includes: Black Snail, Laughing Moon, Sense & Sensibility, Folkwear, and Nehelenia. I've not linked to any of these as the best value vendors for any may vary depending on where you are based and which currency you are using, however many use Etsy or have resellers on there, so that may be a good starting place to look.

My shortlist is based on patterns which appear to be close to the design of the two dresses I have been talking about in detail in this post and the previous one. I knew that finding an exact pattern for either dress was likely to be impossible, so I took what I decided were the key features of both, and focused on those when searching for the most appropriate pattern for me. The key features I decided on were:
  • Back fastening
  • A simple neckline, either squared off, or more rounded
  • Not too high a waistline, and one that was in the cut of the pattern (not defined by a belt only)
  • The plain flat front of the DAR Museum dress
  • A (high) waist seam as part of the dress
  • The puff-band shoulder on the Ginsburg dress
  • Long sleeves that are not tight.
By looking for a back fastening dress, I had to rule out a number of earlier Regency patterns (logically), as the earlier period was better known for the bib fronts to dresses. Some earlier patterns were also ruled out because the bodice shaping was less defined by the cut and more by the belt/overdress. Relatively few patterns had long sleeves, instead going for the short sleeves more suited to hotter climates than an autumnal England! I also wanted that shoulder interest that is in both of my inspiration dresses, so no patterns where the sleeve falls straight from the armscye.

That left me with two patterns! Laughing Moon #138 & Sense & Sensibility "Regency Gown". Technically there is a third, from Fig Leaf, but I found that one after I had completed my purchases.

Laughing Moon #138

Envelope for Laughing Moon 138 - four dress views with long and short sleeve variationsBack of pattern envelope


None of the views on this pattern have the very square neckline shown on the Ginsburg dress but are quite similar to the DAR Museum dress' neckline. The shape of the skirts on all views look appropriate to either of my inspiration dresses.The short-sleeve over long sleeved variant is very reminiscent of the Ginsburg shoulders and sleeves, although a bit too baggy. The way they are made, however indicates that adapting the pattern to have a smoother sleeve could work well.

Sense & Sensibility Regency Dress

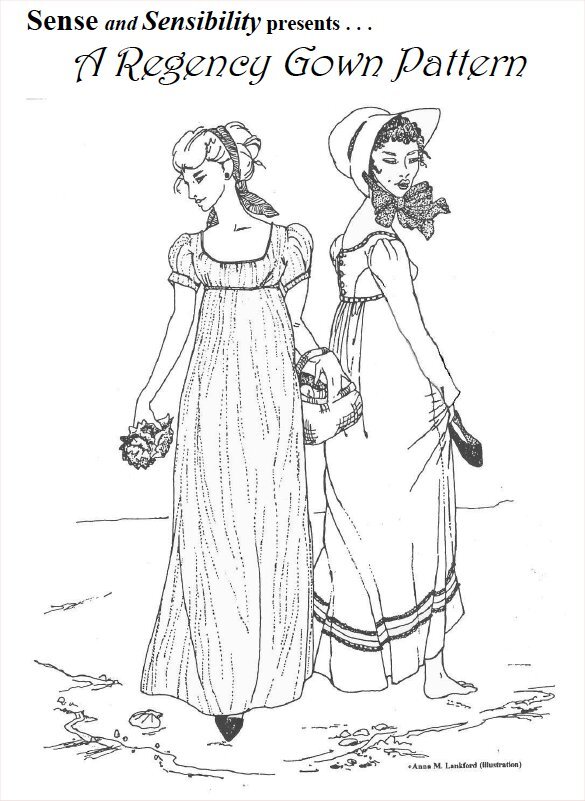
Envelope cover illustration - 2 views


This is the original source of one of the Simplicity patterns, which was licensed from the creator of this one. In my opinion, this is better than the mass market variant because it is more accurate. For my purposes, it is possibly slightly earlier in style that my aim (1801-1812), but a) the author then says "1810s", which would still encompass 1818, and b) US fashions were ever so slightly lagging compared to Europe due to the time for new ideas to travel.

So, the envelope designs didn't seem to be quite what I needed, but then I looked at the photographs of made-up versions, and the first image has almost exactly the neckline and sleeves of the Ginsburg dress. 

Fig Leaf 222

Envelope image for Fig Leaf 222, showing a sketch of the DAR Museum dress

This pattern is specifically based on the DAR Museum dress, but I found it after I had bought another pattern. I would definitely like to buy and try this one later, should I find the need to make another Regency era dress!

~~

So what to do? 

Sizing
The Laughing Moon pattern cover sizes up to 56"/48"/58", whereas the S&S one only goes up to 48"/41"/50" AND requires a supplement to make the larger sizes.
Fig Leaf 222 goes up to 51"/42"/56".
Format
Laughing Moon is paper only for this pattern.
S&S has both paper and PDF options available.
Fig Leaf seems to be paper only
Cost
Laughing Moon is $18.00 plus postage or £23.99 (no postage) from Etsy
S&S in PDF is $9.95 for the base pattern, plus $2.95 for the large chest supplement, no postage, but printing out costs of course.
Fig Leaf is $23.00 plus postage.

In the end I bought the Laughing Moon pattern via Vena Cava on Etsy. Why? The bodice was closer to the later style ones I am hoping to recreate, even though the sleeves aren't quite right. I also figured that if I can't get the sleeves right, I can buy the PDF of the S&S one still, and Frankenstein them together...

Colours

The official descriptions of both dresses describe them as being Clarence Blue. But what is that, and where does its name come from?

With regards to the Queen herself, there are possible indications of the colour she liked. I wrote a separate post last week on Queen Adelaide and blue as this section was getting Rather Long!

Neither my Inspiration dresses nor the portraits of Queen Adelaide are categorical confirmation of precisely what was "Clarence blue". I feel that I have two possible directions I can take.

  1. Follow the colour that is on the garment(s) now
  2. Attempt to decide and re-create the garment in the shade I feel is closest to Clarence blue.

As I am intending to re-create an extant dress, I will be going in direction 1. The colour of the extant garments were what drew me to them initially, so in keeping with that, I plan to make my dress in a colouration similar to the shade they are now, 200 years after they were made. This may not be the original colour, nor may it be a true example of Clarence Blue, but I loved it from the start and that is what I will use. 

Modern fabrics in Petrol Blue, Teals, and dark Turquoises seem to be the best representations of the colour I initially saw.

Fabrics

Both original dresses were in silk, suggesting evening wear. I am not planning to wear either in that way, so I am considering either a heavy cotton or a light wool (or wool mix).


Links/images to dream fabrics
Links/images to more realistic fabrics

Wednesday, 9 September 2020

Clarence Blue & Queen Adelaide

This post includes sections originally from an upcoming post on plans to recreate the Ginsburg &/or DAR Museum dresses, both of which are described as being made of "Clarence blue" fabric.

I fell in love with the two dresses illustrated above due in a large part to their beautiful colour, which is described in their official entries as "probably" Clarence blue. Not knowing anything about this colour, I set off to figure out a) what it was, and b) whether I could buy fabric this colour from modern vendors.

According to both the Cora Ginsburg catalogue and the write-up at the DAR Museum, Clarence Blue was a fashionable colour from c1818. It was called Clarence blue because it was apparently the favourite colour of the new Duchess of Clarence, Adelaide of Saxe-Meiningen (1792-1849). Adelaide had married the aging Prince William, Duke of Clarence in 1818, and both collections suggest that this marriage was the trigger for her favoured colour becoming fashionable. While this sequence of events is entirely logical, I wanted to verify this information before I spouted it off to anyone else. 

Evidence for Adelaide's personal preference in colours is somewhat scanty, or just poorly recorded because no one else has been interested in discussing a former Queen's favourite colour. While I found a number of portraits of Adelaide in shades of blue, neither the National Portrait Gallery nor the Royal Collection Trust (who own many) made mention of any significance of the colour blue to the lady herself. 

This lovely essay by Alden O'Brien of the DAR Museum talks about the fashions in 1818 introduced by or named after the Royal marriages of the Dukes of Clarence and Kent. His essay is a wonderful resource for me, not only for the work he's done on discussing the shade(s) of blue attributed to Adelaide, but also by sharing some fantastic close-ups of both my Inspiration dresses, which I've not seen elsewhere. He also shared the final destination of the Ginsburg dress, which he states is now held by the Met Museum.

Excellent!

O'Brien notes a great reference to "Clarence blue satin" from September 1818, and also states that William DeGregorio (who wrote the Ginsburg catalogue section) has found earlier references back to the February of 1817. I found another reference to "An Adelaide blue silk dress" in the June 1831 issue of The Magazine of the Beau Monde, although the journal unfortunately does not come with any illustrations, nor any further indication of the precise shade of blue. As so often happens, the assumption that the reader already knew what the author was talking about leads to a sad and unintended loss of knowledge. These entries definitely indicate a contemporary association between the broad colour "blue" and the person of Adelaide of Saxe-Meiningen.

Shade?

But what shade of blue was Clarence Blue?

My first assumption would be to look at the two dresses and to assume that they exemplify the colour, but DeGregorio and O'Brien both make it clear that this is an assumption made through correlation, not a definitive proof of the shade. What do I mean by that? Here are the following things we know for sure:

  • There was a shade of blue popular in c1818 which was referred to as Clarence Blue
  • These dresses date from approximately 1818 based on other evidence (e.g. skirt style, provenance etc.)
  • These dresses are in a shade of blue

What we don't know for certain from these dresses specifically is that these dresses are proven to be in the shade that was called Clarence Blue.

Sarah Walden wrote a blog post in 2011, where she tried to show swatches of all the colours popular during the Regency era. This is a really interesting post, and I find it really useful for seeing the broad categories of where a named shade fit, but I'm not sure whether all are accurate. Her list does include Clarence blue, but the colour is very different to that of the dresses. Sarah describes Clarence blue as being "another ... sky blue", and her swatch is very similar to the colour shown on the ColourLovers website as "Clarence blue" (hex: 79A3DD; RGB 121, 163, 221).

I feel that Walden's swatch for "Prussian blue" is a better match with the colour of dresses, or another ColourLovers swatch named "Clarence" (hex: 3A5470; RGB: 58, 84, 112). There appear to be a multitude of colours described as Clarence or Clarence blue, which vary incredibly. Add in the variations of fading over the 200+ years between 1818 and now, and I can understand why we are viewing such a wide variety of possible answers.

DeGregorio refers to her 1831 NPG portrait (see below) as an example of her wearing "the distinctive hue", and also describes it as a "deep sapphire colour". 

O'Brien refers to another 'new' colour that became fashionable after the accession to the throne of Adelaide's husband, now King William. This colour was called "bleu Adélaide" and was a light blue rather than the richer sapphire identified by DeGregorio. This suggests to me that sometime in the intervening centuries the two shades have become merged into the same name of "Clarence blue". 

Possible Examples

There are numerous portraits of Adelaide surviving, where she is wearing shades of blue, although I am not able to tell whether these are likely to all be attempting to depict the same original shade. Below are a few that I can share which are a) reproduced online in colour, and b) reliably identified as being of Adelaide as either the Duchess of Clarence (1818-1830) or Queen Adelaide (1830-1849).

RCIN 420216. Royal Collection Trust. c.1818?

Duchess of Clarence by Mrs James Green c 1818
Portrait of Queen Adelaide, when Duchess of Clarence, c.1818
(c) RCT

This dress in this image is a light and bright blue, without any obvious green or red undertones, except to the rear of her right shoulder (left as you look at her). 

NPG 1533. National Portrait Gallery, London. c.1831

Queen Adelaide by Sir William Beechey c 1831
Queen Adelaide (Princess Adelaide of Saxe-Meiningen) by Sir William Beechey, circa 1831.
CC BYNCND

The image here is quite dark, but does show a beautiful blue velvet with a slight hint of green to it. It is definitely not a "sky blue" shade.

RCIN 420239. Royal Collection Trust. 1844

Dowager Queen Adelaide 1844
Miniature of Queen Adelaide, 1844
(c) RCT

This is a miniature image of the Queen Adelaide, which is dated 1844 on the reverse. The dowager Queen is again wearing a vivid shade of deep blue.

RCIN 405389. Royal Collection Trust. 1849

Queen Adelaide portrait 1849 by Winterhalter
Queen Adelaide, 1849, by Winterhalter
(c) RCT

This portrait of the Queen was one she sat for shortly before her death in the same year. The RCT describes her as "wearing a black lace cap", but the trim on her lace cap appears quite blue in the website image. This blue looks to me to be a more green based one, compared to all the earlier portraits.


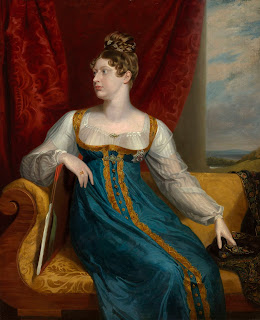
The exact shades of items in portraits cannot always be assumed to be completely accurate. Princess Charlotte wore a blue sarafan-style dress (known as "Princess Charlotte's Russian Dress") shortly before her death in November 1817. The Royal Collection Trust holds both the original dress and a portrait of her wearing it, and a second variant of the portrait is in the National Portrait Gallery. None of which have precisely the same shade of blue. 

Conclusion

The dresses as they are now, show a green base to the blue, which isn't really reflected in the portraits. The fashion plates shown by O'Brien also show a deeper blue akin to the shade in the portraits. My current opinion, based on the information I have to date, is that the deep rich blue of the portraits is the shade originally referred to as Clarence blue; and that the lighter sky-blue shade was the shade described in 1830 as "Bleu Adélaide".

Saturday, 5 September 2020

The Visible Layers: Part 1 - Questions, &, Inspiration for the Dress

My big initial questions


Day vs Evening dresses. Walking dresses. Practicalities based on Promenade dress vs dancing dress.

So, continuing on from my general musing on what "I" would have been most likely to wear, I also started to consider practicalities. These practicalities are twofold: 

  1. Where will I be, what will I be doing, and what time of year?
  2. What is my realistic budget (financial & chronological)?
The answers to this are:

Question 1:
  • Bath, so England, and more to the point, outside in the Promenade
  • Walking and "showing off"
  • Late summer into Autumn
Question 2:
  • Financially
    • If I spread financial costs, then I can afford a nice-but-not-elite dress. So good quality fabric, but probably not 100% natural fibres unless there's a nice sale on with what I need.
    • I might be able to make a cheap polycotton test run dress, but otherwise I will only be able to afford the fabric for the main dress. Fabric, followed by notions, will probably take the largest portion of my budget.
    • New era: Also, this is one event, so it's not reasonable to invest that much into a new era which I may not regularly return to.
  • Chronologically
    • I am a slow sewer, and as I currently do not own a sewing machine - the one I use is locked down at the opposite end of the country from me right now - I will be hand-sewing everything to begin with, so I feel that it would be more realistic to make one versatile dress, rather than separate day, walking or evening dresses. 
    • I will need to make/obtain a shift, stays, and a petticoat (or two) at a minimum, and will have to make the appropriate financial or chronological adjustments to own them. This affects the dress in that time spent on those layers takes away from time available to make another dress.
    • Time also means that a very decorated or fancy dress would be less practical. One with clean lines, and relatively simple decoration will be easier to complete well within the time constraints.

Decision:

A walking dress would be ideal, but a day dress would be more versatile and could even potentially be an evening dress with appropriate accessories. 

Inspiration

These two dresses are the two I feel completely in love with. Initially the colour caught my attention, but each has elements which I really like, and which also fit with the "me" I want to portray.

Three regency dresses with shawls. Right two images are of the same dress.


The dress on the left is listed in the 2016 Cora Ginsburg catalogue (PDF). It is described as being from the USA and of "Clarence-blue silk twill" or of "levantine", and is dated to c1818. The deep blue shawl Kashmiri shawl isn't original to the outfit, but would be appropriate to the period. I adore the details at the cuffs, the shoulders, and across the chest, but I suspect that my skills aren't quite there yet.

Wrist details for Ginsberg dressHem details for Ginsberg dressChest and shoulder details for Ginsberg dress


The second dress is in the DAR Museum, and is dated to c1818-1820. This dress is also described as being in "Clarence-blue" silk, and I freely admit to having fallen in love with the colour of both these dresses. The dress does not appear to be made of a "shiny" silk, but rather a crepe.

The decoration on this dress is in the form of bands of shiny bias-cut satin silk that has been sewn on around the shoulder caps, on the cuffs, and at the hem; three bands in each location. There is also another band of the same contrasting fabric around the high waist. The triple bands sewn at the edges of the shoulder caps and those at the cuffs are all of narrow equal widths; probably a few cms at most. In contrast the bands at the hem are graduated in width towards the hem, and are significantly wider.

The sleeves appear to have an extra frill at the edges of what looks like lace. The neckline is simple and the Museum has chosen to fill it in with a file almost transparent ruffed chemisette, and it is not clear whether this is also at the cuffs, or if that is a separate piece of decoration.

Wrist details - DAR museum dressHem details - DAR museum dressBodice & shoulder details - DAR museum dress


It is interesting that both these dresses are believed to have been made and worn in the USA, but are in a colour that because famous and fashionable specifically due to Princess Adelaide, who married the British Duke of Clarence in 1818 (hence the name). It is believed to have been her favourite colour.

Unfortunately I've not been able to find any fabrics being sold specifically as "Clarence blue", but I have found some modern shades which seem to approach this blue-with-a-greenish-hint. More on that in a later practicalities post.

Other dresses I liked 

...but ultimately haven't gone with (this time?)

1. Princess Charlotte's Russian Dress 

(That's it's actual name!)

I saw this one in an exhibition at the Queen's Gallery a little while back, and I still love it. It's definitely on my list of dresses I'd like to recreate one day.
Painting of Princess Charlotte in her so-called "Russian Dress"

2. Tat'yana Borisovna Potemkina, by Vigée-Lebrun, 1820

I love the colour and the cross-over style front. The long sleeves with the lace are also quietly beautiful.

Painting of Tat'yana Borisovna Potemkina


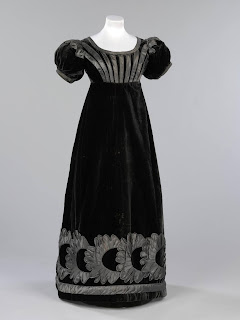
3. Jane Johnstone's Mourning Dress

This dress in the V&A is marginally later than I was originally looking at, but I love the simplicity and shape of the bodice decoration. I'm also a big fan of both black and of velvet, although I've not sewed it in decades. My other half likes the decoration on the bottom, as well, so we both like different elements of it. I think this one is on one side for if I ever need a regency or even early Victorian evening/ball dress.

1820s black velvet mourning dress in the V&A
 © Victoria and Albert Museum, London


Formal mourning dress of black velvet and grey silk satin decorated with satin piping and appliqué. The dress is full length and has a wide, shallow neckline outlined with grey satin piping. It is lined with cream silk in the bodice and black silk grosgrain in the skirt. The short puff sleeves are decorated with an appliquéd satin motif stemming from the shoulder seams and are finished with the same satin piping. The waist is high but falls a good 5-10cm under the bust. Decorative lines of satin appliqué stem from the waistline to the neck and shoulder seams on the front of the dress and two lines of piping form a V shape from the waist to the shoulder seams on the back of the dress. The dress fastens at the back from the waist to the neck with seven hooks and eyes and a drawstring at the neck. The skirt is gored with a circumference of 220cm around the hem and is gathered slightly at the waist. The hem of the skirt is appliquéd with a wide band of an overlapping, simplified floral motif in grey silk satin, underlined with a band of satin piping.


Wednesday, 19 August 2020

The Base Layer

This post is about my plans for making/buying Regency era underthings for my 2021 Regency Project.


The Layers

There are three main undergarment layers in the Regency period. I own nothing suitable at present, so I will need to buy/make everything here.

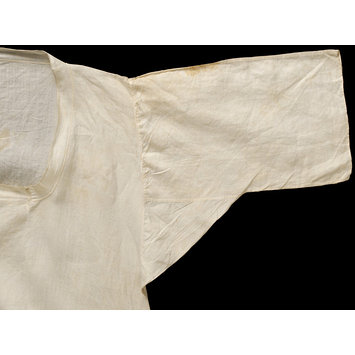
1. A shift - This will be a basic, square necked garment. The purpose of this garment is to protect my outer garments from me, as in my sweat etc. The shift is easier to change and to wash, so was very important for keeping outer garments less smelly or dirty. They didn't wick everything away, but less sweat on your fine dress is still better. In the Regency era there seems to have been some variation on whether your shift had sleeves depending on what you were wearing. When worn with a long sleeve dress, it could have had short sleeves like the V&A example below, but with the very short sleeves, it may have just had a slim shoulder strap. Unlike a medieval shift (the ones I have currently!), a Regency shift has a much more open and square neckline to fit under the dress necklines of the era. Although women were still rarely showing actual cleavage at this point, the area between the neck and breastbone was more likely to be partially or completely uncovered in comparison with earlier eras. That necessitated the change in necklines.

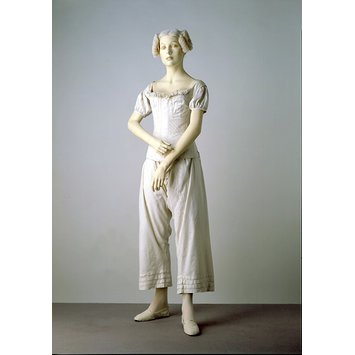
1a. Long drawers or pantalettes. In the later Regency era, this layer sometimes also included leg coverings (see the below the stays in the next image). These could even be visible below the skirts for some women. These were two single legs gathered to a band as clothing approaching modern knickers wasn't worn by "nice" women at this point.

2. Long stays (image from the same page as the V&A shift above). Along with the change in necklines and shift patterns, this era also saw a change in undergarments. Others have done far more research than I on the changes of support garment during this era, but in summary, the main changes were a distinct "cup" area which caused/was caused by a change in how the breast tissue was shaped and supported. Prior to the introduction of the Regency silhouette, women's breast area was supported by being bound against the body, usually either with a specific boned undergarment or via the cut of their underdress or kirtle. The flimsiness of early Regency dresses seems to have triggered a need for a new type of support, which went through various iterations. In the c1818 period I am looking at, this would have been long stays. Long stays could be boned or corded, and gently contoured the body from armpit to around the hips, and seem to have included dome kind of breast cupping or pocket.

Regarding the stays I will make or buy, I read this rather interesting study, which seems to suggest that by the time I'm looking at, cording was beginning to be dominant over boning as the method of support. Depending on patterns and cost of materials, I will seriously consider whether "Harriet" would have worn an older set of stays that from 10+ years earlier, or whether she might have updated to the newest style... 


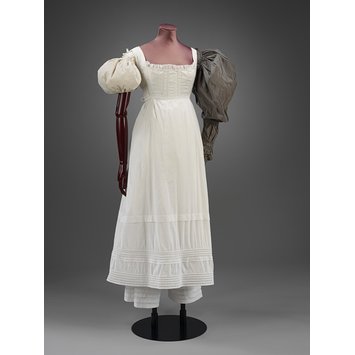
3. A petticoat which goes over the stays and protects the dress while creating an appropriate shape. Like the shift, the petticoat had been forced to change shape from earlier eras. Some Regency petticoats were hung on thin straps from a high underbust waistband, and others were entirely without straps. I am practically minded, so thin straps seem logical to reduce the risk of it slipping!

The image below also includes artificial arm puffs to boost the shape and stability of early Regency sleeves. That's not in my plan so I won't need them at least!


I'll skip (making) other underwear and wear normal tights instead of stockings.

To do list for an underwear layer:
  • Buy a basic suitable shift from a vendor, possibly at the next TORM that runs
  • Make a set of long stays. Long ones because I'm "squishy", and need more control to achieve that silhouette.
    • Buy a kit and pattern - 
      • I'm looking at getting this RedThreaded kit if the postage isn't too punitive and I choose the boned variant
      • If I go for corded, then maybe the Laughing Moon pattern #115 . This pattern also includes instructions for a simple chemise. I found an online class that follows the LM pattern as well. These instructions may help if I go it alone. 
  • Buy fabric.
    This layer will be next to my skin, so it needs to be breathable. Going by museum pieces and the Foundations Revealed article (linked above), I will probably buy cotton instead of linen, as cotton seems to be beginning to dominate for underwear by the later Regency period.

    A middle class lady may well have had contacts with the owners of the burgeoning local cotton mills by blood, marriage, or friendship, so wearing cotton would have been a practical choice.

Next post, next layer! The Dress.

Sunday, 16 August 2020

A Regency Outfit?

So, my first sewing project for 2020 is looking like it might be a complete Regency outfit...

It's not an era I have a particular interest in, as far as costume is concerned, but it is an era I love for fiction settings. The Discord group I am a part of has suggested going to Bath and either joining with, or meeting up with those who are formally part of the 2021 Jane Austen meet-up. So, that needs Regency appropriate attire.

Now my first thoughts for the Regency era are based on ball dresses and outfits worn during the Season - both from museum collections and in novels. They don't appeal at all. I'm neither young nor sylph-like, and I feel that I'd just feel so self-conscious in a flimsy muslin dress, let alone a White dress. My disabilities affect co-ordination, so white as a colour is deeply Out for me - I will be wearing something on it by the time I get there, if not before I leave the house. 

So, no flimsy, white muslin for me. Does that mean no Regency clothes at all?

I'm older, married, and also not rich. If I was living then, I would have no need to wear the "pretty" clothes of a debutante or other husband-hunting Society lady. What if I dress as a middle class lady, and one of middle age? Oh, and it's winter, would an older lady really have worn muslins in November? What about white? Wasn't that for young virginal women who were showing off their purity for potential husbands? I don't need that, I can "wear colours", so I shall. I don't have a lot of money, so I can see it would be reasonable to wear something less fussy than a young, and/or wealthy woman.

On "It's winter!", what about a coat, or headwear?

Oh, and underwear. Oh hell, I'll need underwear - you can't get an authentic outline without the right underwear!

So, as it's very much early days, and nothing is decided, but below are the beginnings of my thoughts, inspiration, and tentative plans.

I've fallen in love with two dresses from c1818, so I'm looking at narrowing my clothing to broadly that year. 

I've realised that my way of approaching the concept of a dress from a specific period is to create myself a rough character. That "character" is mostly a meditation on who would I have been if today was 1818? 

My "character"


As an "older woman", I can get away with have clothing items that are a few years out of date as don't feel I'd have been in the first stare of fashion). I'm giving 'her' the name/reference of Harriet or Henrietta.

So who is this person I feel I would be?

Middle class - I have never been wealthy, but having grown up solidly middle class, I feel that that is a background I feel confident in portraying. It's also more realistically achievable for me - while I couldn't afford fine silks even now, I can afford to buy decent quality fabrics if I budget sensibly.
Older - I have no desire to pretend to be younger than I am, and I am not ashamed of my real age, so I'm content to portray a woman in her 40s
Married - hopefully my other half will be coming to Bath with me, and may even be willing to dress up too. A married woman would be more likely to wear the darker and richer colours I prefer, and wouldn't be looking for a marital partner. A single woman in her 40s would have been reliant on her relatives in a way that a married woman was not, and I feel that I am pragmatic enough to have married for "job security" when I was younger. 
Comfortable - By this I am referring to her preferences in fashion. She's neither first stare of fashion nor totally out of date. She's comfortably within the range of normal for her era, without being at all obvious.
Quiet - not physically quite, but in line with the "comfortable" above, she is not overly visible or noticeable. As someone who is not always seeking the most up-to-date fashions, she's therefore less obvious and more likely to blend in with the background scenery. This fits with an older middle class lady who is not seeking to raise her station or marry off children. She has no need to be noticed, so she dresses "quietly" so as not to draw excessive amounts of attention. I'm an introvert, so I am more comfortable and confident when I am not the centre of attention, and Regency Me is going to be the same...
Neither poor nor wealthy - this is different to class, which was somewhat less easily changeable. Because my creations have to live within my real life budget, I choose not to portray someone who is vastly more wealthy than I am. I choose to portray a woman who is comfortably off, but not rolling in money. She can afford nice fabric, but she won't have multiple changes of clothing nor a vast wardrobe of clothes to pick from. She prefers to buy/make one to two good quality items and vary how they look with accessories. Her clothes will be well made and made for/fitted to her, rather than second-hand and made over ones. They aren't high fashion, because that lasts longer and she's not so wealthy as to waste money on buying new clothes before the older ones are unsuitable for wear. She has some servants, but her clothes are cut to allow her to dress herself where possible rather than being reliant on employing a dedicated ladies maid.

Creating the Costume


Subsequent posts on this topic will go through my plans for making/buying the different layers to dress u[ as this character. Before I go though, here is a great guide to the general outline of the layers: http://www.uvm.edu/~hag/regency/tips/


Saturday, 8 August 2020

Who Am I?

Who Am I? Where Do I Want to Be?

Two hard questions to answer, but ones which I need to face up to and then answer.

Who Am I?


So, who am I? 

On the surface, this is an easy question to answer - I'm me, I'm >>name<<, and so on. 

Or do I define myself by others - I'm the spouse of, the child of, the parent of, the sibling of someone...?

Or perhaps by what I do professionally. I'm a librarian, I'm a researcher, I'm a medievalist

Or by personal traits? I am a nerd, I am intense, I am focused, I am frustrating, I'm INTP

Or by ability/disability? I am autistic, I am arthritic, I am neurodivergent, I am disabled, I am dyslexic, I am a person with executive dysfunction, I'm someone with allergies/intolerances

Or by leisure activities? I am a reader, I am a music lover, I am a violist, I am a crafter, I am a sewer, I am a re-enactor, I'm a baker, I'm a cook, I'm a musician

Or by labels others have given, foisted on, or granted to me? Annoyance, Nuissance, Scarily organised (hah!), Weirdo, Wench, 

Or? You see, who am I is a lot more of a question than people think it is. And some of those things may also be hard to accept - for example, I am quite happy to say I have disabilities, but I feel very uncomfortable saying "I am disabled". Why are these two things different? What about things I love, used to do, and which I would like to do again, but yet currently don't do now. Am I still able to use those to define me?


So, given the above, why have I been spending so much time considering this whole anal naval gazing process? Put simply, because I'm a mimic, and with that I've realised I'm losing myself.


Mimicry


So what does mimicry mean in this context? Mimicry is an aspect, for me, of ASD. It means that I reflect other people's interests and ambitions, and can end up confusing their interests and desires with my own. It isn't intentional, but the more I've become aware of it, the more frustrating it's become for me. I've been using the COVID shutdown, and my own shut-in, to try to "bring myself together". One aspect of that is to force myself to figure out what I'm interested in because I love it, and what I'm into solely because someone else is (or was!). The posts I am planning on writing and releasing over the next few weeks, months, and possibly longer, are designed to focus on each of these things and to help me analyse what is ME in my likes and loves, and what should possibly be viewed more as an appreciation of another's love. 

Hopefully this will help my mental health a lot by enabling me to focus on suceeding on the ME things, and to gently put the "that's cool and interesting" things into a box in my head which is just enjoyment. I am now in my 40s, and we don't get to re-run this simulation - this life is what we get. I want to ensure that I make the most of what time I have by narrowing the focus for my skitterish brain.

Where Do I Want to Be?


As part of figuring all this out, I need to work out what are my personal ambitions. Destination is also an important part of self-definition. We can't be at a destination before we know how to get there, or even if it is possible to get there. Or do we even have a destination worked out? I want to go on holiday "abroad" compared to "I want to go to Europe" (better), "I want to go to France" (better again), or "I want to go to Toulouse"... 

We need two main things: A clear destination, and an idea of what route we would need to get there. 

To return to my holiday example: I can walk to Toulouse, or drive, go by train, or fly. Walking is impractical because of time - I wouldn't be there before I'd need to come home! Driving is a good idea, but I can't drive. I could fly, but I dislike the carbon emissions from flying, so I'd rather not, which leaves the train. OK. 

New Considerations
How much is a train ticket; 
Can I afford it or do I need save up; 
How long will it take to get there; 
Do I need to plan food; 
Can I carry what I need on public transport; 
What about changing / connecting trains; 
Crossing Paris or London with luggage

And all that is before one considers accommodation, booking train tickets, and what dates you are going to go! Let alone what to do when there, spending money, and so on...

So a more practical life example:

If I want to be able to consider myself a musician, then I need to... play my instrument. I need to practice, regularly. I need to consider whether I want to join a group, a symphonia, or an orchestra. Sometimes those goals need financial input, or time input to be achievable. So, using the above: 

My destination is to play in an amateur orchestra.

  1. I need an instrument - this might involve researching costs, value for money, and saving up. What practice can I do before I get an instrument? Are there hire-purchase schemes through local shops, could I get a cheap-and-nasty while I save up? Perhaps I can work on bow posture, or sight reading, while I save.
  2. I need to practice. Regularly. This will have to become a habit. I can't just play pretty tunes, I need to do theory, and scales, and other boring stuff too.
  3. I need to put myself out there. Perhaps find a teacher
  4. I then need to start looking for groups I can join. They won't come to me, I need to go find them, and ask to join. And then go!

Life is full of sequences like this. I can also look at those steps and say, actually, I just like playing tunes at home, and I have an instrument already. So I need to just play occasionally for fun or relaxation, and that's fine. Perhaps while I'd love to join an orchestra, I can't commit the time, or I can't physically undertake that amount of playing every week. That's OK. I can do as much as I want, how I want instead. And yes, I can still call myself a musician if I want!

Sometimes this process will be painful. Painful? Yes, because sometimes our self image isn't realistic and we discover we're not who we thought we were. Our self-definitions were inaccurate. And sometimes they're painful because we realise we can't do what we want, how we want, because of life limitations. I might want to up sticks and move to another country, but I won't get a visa, I don't have a desired occupation, or I have a partner who doesn't have the same dream. Sometimes compromise is necessary, but part of this process for me is going to be analysing where I'm open to compromise, and where I'm not. 

Returning once again to my holiday example:

I want to go to France, my partner wants to go to Germany. I want to see the Lascaux caves in Padirac, so I'm not willing to compromise on France. Or maybe I want nice dinners and a river, so I'm happy to look at Germany too. What about travel? I'm ambivalent over how we go, but carbon consumption is important to them, or they suffer from claustrophobia, so we choose to go by train. Life is about compromises, and learning what we can and can't compromise on. I'm intentionally not saying "willing to compromise", because I might be not be able to compromise on an aspect no matter how willing I am. I also want to emphasise to myself that this exercise is about trying to find where I can give, and where it's important to me that I don't, so while I might not want to compromise, I might need to in order to prioritise something else. 

Essential
Need
Desire
Would like
Nice to have
Prefer to have
Prefer not to have
Rather not
No
Definitely not
Absolutely not
Never